

How To: Repair Replace Porsche 986 996 Climate Control LCD Display Screen
INTRODUCTION
With over 10 years experience repairing this device, we can confidently assure you that the process outlined will resolve the common LCD failure of this climate control. Please follow instructions carefully and take precaution when necessary.
Sometimes this failure will occur in cars that experience impact to glass, or in extreme cold/hot weather conditions.
This issue is very common, luckily there is an aftermarket for parts to fix it! Otherwise, a trip to your Porsche dealer may cost you hundreds of dollars.
Links:
New LCD Repair Kit
Fast Professional Repair Service:
TROUBLESHOOTING
The symptom of a failing HVAC is easily noticed when:
- Display Pixels Begin Disappearing
- Screen Becomes Illegible
- Bright Orange Blotch Appears on Display
PREREQUISITES
Tools
- T10 Torx Driver
- Small slotted screwdriver (slot < 1/4"), or an equivalently-sized dowel about 2" long and a hammer
- Pliers
- Microfiber towel or soft cloth
- [Optional] Small workbench vice with "soft jaws" (foam padded)
Parts
Removal / Disassembly Procedure
- Disconnect the negative battery cable from the battery terminal. A short 13mm socket and ratchet will be required. Insulate the terminal in a work glove or otherwise wrap it such that it will not contact either the battery terminal or any nearby metal including the vehicle body.
- Move the gear selector for clearance purposes. Apply the parking brake to ensure the vehicle will not roll, press and hold the brake pedal for good measure and then move the gear selector away from the dashboard so the OBC can be removed without hitting the selector. In manual transmission equipped vehicles this will likely be as easy as moving the selector into neutral. In automatic transmissions equipped vehicles, however, it is necessary to turn the key to position 1 (in addition to stepping on the brake pedal) to disable the interlock before the selector will move aft.
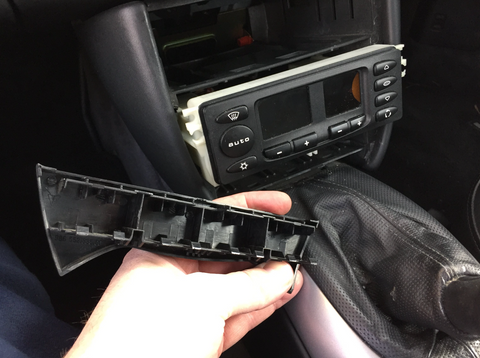
- Remove the Climate Control. In the Porsche 996 and 986 you might notice a plastic trim below the climate, it will pull out of dash as it is not held on with screws. Simply pull it off. Then, Remove the CD Trays above climate by pulling out of dash. Remove the trim from around the climate control, which will expose 2 torx screws. Remove torx screws and pull climate forward


Return the vehicle to first gear or Park, as appropriate to prevent the vehicle from rolling and remove the key from the ignition if appropriate.
Remove the HVAC Controller. Reach into the hole in the dash left by the Climate Control and pull device forward and out of the dashboard. This will expose a few cables that must be disconnected. To remove cable, simply push onto top of plug and pull out of socket.

Prepare a workspace suitable for electronics rework including ESD protection. Make sure your workspace has bright lighting, a magnifying lens if required.
Remove LCD Housing From Board. The fan must be removed before disassembling the unit, but it need not be replaced unless the fan does not spin freely. It is replaceable from BMW, but compressed air and lubrication will make it run more efficient and quietly.


Remove the controller faceplate. Place the controller on its face and remove (4) T7 torx screws holding the chassis to the faceplate. Then pull to detach from housing.

Detach the face panel from the case. Remove faceplate from climate control housing. Keep clear rubber pad inside of faceplate
Pry Straight Metal Tabs holding LCD panel onto PCB

You will now Remove LCD Housing from PCB Circuit Board

Take Apart LCD Housing. You will want to remove the old LCD and rubber pads.


Insert Replacement Display just the opposite process used to take it apart.

Reassemble Dash, Enjoy Your Repaired Part!

Helpful Video:
Contact Us:
Website: www.germanaudiotech.com
eMail: support@germanaudiotech.com
eBay Store weblink: http://stores.ebay.com/germanaudiotech
Amazon Store weblink: http://www.amazon.com/GERMAN-AUDIO-TECH/pages/10701447011